For the development of a UserForm it is necessary to properly add the controls in order to create a layout. For these controls the VBA code is inserted, allowing form functionality.
If you are not already familiar with the default ActiveX controls for UserForms, see the previous topic: Toolbox.


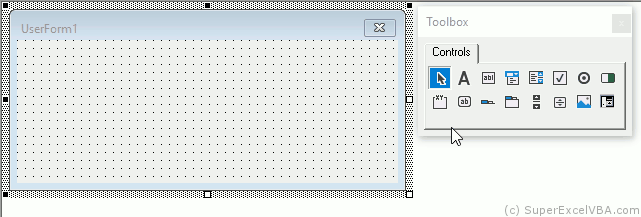
After adding a control, VBE automatically activates the Select Objects function for editing.
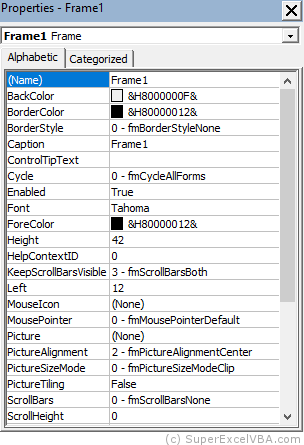
Another type of editing that can be done that also impacts the layout is through the Properties Window. This window allows you to change attributes of the UserForm and its controls.
If the Properties window is not showing in your VBE, go to: View $\rightarrow$ Properties Window or press  .
.
The displayed properties will always be the last object selected with Select Objects. If you want to change a property of a specific object (E.g. as Frame1) simply select it with the Select Objects control
The most commonly changed properties are: (Name) and Caption .
It is not recommended for beginner users to change the (Name), however it is important to know that it can be changed.
| Property | Description | Example |
|---|---|---|
| (Name) | Sets the name used in the code to identify the object | Frame1 |
| Caption | Sets the text contained in the caption | Employee Registration |
If you want to make a slightly more elaborate design it may be interesting to change the properties of the Font and the Background Color (BackColor).
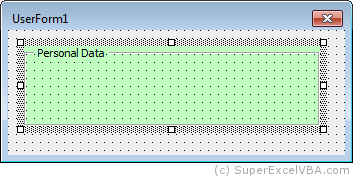
In this example we changed the property of
of the object named Frame1 (whose Caption is "Personal Data").
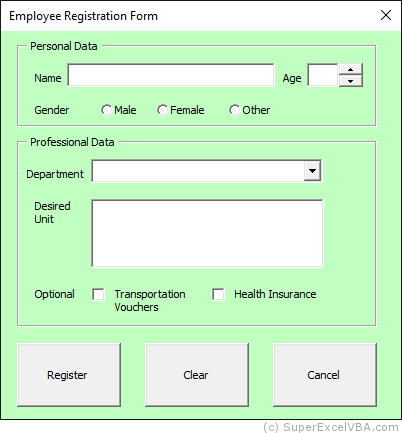
To create a good UserForm it is often necessary to add multiple controls and change their Captions. The following is an example:
Layout in edit mode
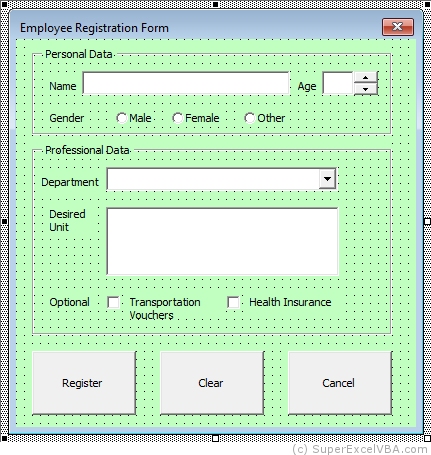
| Controls | Captions |
|---|---|
Frames ( ) $\rightarrow$ 2 ) $\rightarrow$ 2 |
Personal Data; Professional Data |
Labels ( ) $\rightarrow$ 6 ) $\rightarrow$ 6 |
Name; Age; Gender; Department; Desired Unit; Optional |
TextBoxs ( ) $\rightarrow$ 2 ) $\rightarrow$ 2 |
No caption (It is located next to the Labels "Name" and "Age") |
SpinButton ( ) $\rightarrow$ 1 ) $\rightarrow$ 1 |
No caption (It is located next to the Label "Age") |
OptionButtons ( ) $\rightarrow$ 3 ) $\rightarrow$ 3 |
Male; Female; Other |
ComboBox ( ) $\rightarrow$ 1 ) $\rightarrow$ 1 |
No caption (It is located next to the Label "Department") |
ListBox ( ) $\rightarrow$ 1 ) $\rightarrow$ 1 |
No caption (It is located next to the Label "Desired Unit") |
CheckBoxs ( ) $\rightarrow$ 2 ) $\rightarrow$ 2 |
Transportation Vouchers; Health Insurance |
CommandButtons ( ) $\rightarrow$ 3 ) $\rightarrow$ 3 |
Register; Clear; Cancel |
Layout in view mode
To access view mode just press  or .
or .
Although the layout is ready, you still need to configure the code so that the form has functionalities.
SuperExcelVBA.com is learning website. Examples might be simplified to improve reading and basic understanding. Tutorials, references, and examples are constantly reviewed to avoid errors, but we cannot warrant full correctness of all content. All Rights Reserved.
Excel ® is a registered trademark of the Microsoft Corporation.
© 2025 SuperExcelVBA | ABOUT

